If you’re just starting with GUI programming in Python, building a simple calculator is a great project. This blog will guide you through creating a basic GUI Calculator with Tkinter library, Python’s standard GUI toolkit.
Step-by-Step Breakdown
We begin by importing tkinter with from tkinter import * and initializing the main window using <strong>root = Tk()</strong>. The GUI window is sized using root.geometry("430x500").
Next, we declare a global string variable expression, which will store the arithmetic expression entered by the user.
To handle user input, we define the setexpression() function that appends numbers or operators to the expression string and updates the entry field. The c<strong>alculator()</strong> function uses Python’s built-in <strong>eval()</strong> to evaluate the expression and display the result. Errors (like incomplete expressions) are caught using a try-except block. The clear() function resets everything for a new calculation.
We use a StringVar to bind the value in the entry field and display the expression or answer dynamically.
Building the Interface
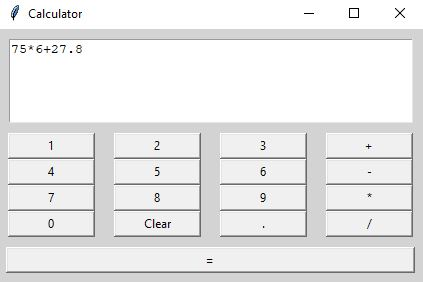
The layout is created using Entry and multiple Button widgets. Each button corresponds to a number or operator and calls the setexpression() function with the appropriate value. Buttons like “=“ and “Clear” trigger their respective functions (calculator() and clear()).
The buttons are placed using the <strong>.grid()</strong> method, neatly organizing them into rows and columns for a familiar calculator layout.
Code: GUI Calculator with Tkinter library
# importing the tkinter module
from tkinter import *

# initializing the tkinter
root = Tk()

# setting the width and height of the gui calculator
root.geometry("430x500")    # x is small case here

# declaring an empty string variable
expression = ""

# defining function which will set expressions and answers to the  user
def setexpression(num):
    global expression
    expression = expression + str(num)
    value.set(expression)

# defining a function to calculate the expression entered by the user
def calculator():
    try:
        global expression
        answer = str(eval(expression))
        value.set(answer)
    except:
        value.set("Enter correct expression")
        expression = ""

# function to clear everything in expression
def clear():
    global expression
    expression = ""
    value.set(expression)

# declaring font variables as ("Language", size)
large_font = ('Verdana', 15)
small_font = ('Verdana', 10)

# declaring variable to take value of expression entered by the user
value = StringVar(value="Enter expression")

# entry widget to take expression from user and to show
# calculations
Entry(root, textvariable=value, font=large_font).grid(row=0,
    column=0, columnspan=4, ipadx=70)

# Now, there are some most basic buttons which should be present
# in a calculator
# here, each button is calling the setexpression function which
# is used to set values in the entry widget entered by the user
# on pressing the buttons 1, 2, 3, 4, 5, 6, 7, 8, 9, 0, .
Button(root, text="+", fg="red", command=lambda:
    setexpression("+"), height=4,width=8).grid(row=1,column=0,pady=10)
Button(root, text="-", fg="red", command=lambda:
    setexpression("-"), height=4, width=8).grid(row=2, column=0, pady=10)
Button(root, text="X", fg="red", command=lambda:
    setexpression("*"), height=4, width=8).grid(row=3, column=0,pady=10)
Button(root, text="/", fg="red", command=lambda:
    setexpression("/"), height=4, width=8).grid(row=4, column=0,pady=10)
Button(root, text="1", fg="red", command=lambda:
    setexpression("1"), height=4, width=8).grid(row=1, column=1,pady=10)
Button(root, text="2", fg="red", command=lambda:
    setexpression("2"), height=4, width=8).grid(row=1, column=2,pady=10)
Button(root, text="3", fg="red", command=lambda:
    setexpression("3"), height=4, width=8).grid(row=1, column=3,pady=10)
Button(root, text="4", fg="red", command=lambda:
    setexpression("4"), height=4, width=8).grid(row=2, column=1,pady=10)
Button(root, text="5", fg="red", command=lambda:
    setexpression("5"), height=4, width=8).grid(row=2, column=2)
Button(root, text="6", fg="red", command=lambda:
    setexpression("6"), height=4, width=8).grid(row=2, column=3,pady=10)
Button(root, text="7", fg="red", command=lambda:
    setexpression("7"), height=4, width=8).grid(row=3, column=1,pady=10)
Button(root, text="8", fg="red", command=lambda:
    setexpression("8"), height=4, width=8).grid(row=3, column=2,pady=10)
Button(root, text="9", fg="red", command=lambda:
    setexpression("9"), height=4, width=8).grid(row=3, column=3,pady=10)
Button(root, text="0", fg="red", command=lambda:
    setexpression("0"), height=4, width=8).grid(row=4, column=2,pady=10)
Button(root, text=".", fg="red", command=lambda:
    setexpression("."), height=4, width=8).grid(row=4, column=1,pady=10)

# "=" button to call the calculator button which will return and
# show the calculated value in the entry widget
Button(root, text="=", fg="red", command=calculator, height=4,
width=8).grid(row=4, column=3, pady=10)

# "Clear" button to call the clear function which will clear the
# entry widget so that the user can start clculating again
Button(root, text="Clear", fg="red", command=clear, height=4,
    width=20).grid(row=5, column=1, pady=10)

# .mainloop() is used when the code is ready to run
root.mainloop()
Conclusion: GUI Calculator in Python with Tkinter
Finally, <strong>root.mainloop()</strong> is used to run the application. Once executed, you’ll have a fully functional, beginner-friendly calculator with a graphical interface.
For more python & coding projects visit here. Thanks for your precious time: codehelping.com